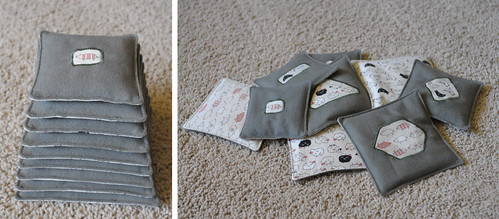
I ordered some fabric from on online store for a quilt I wanted to make, but when I got it I was a bit disappointed, as it really wasn’t quilting weight fabric. I need to pay more attention. (;_;) But I still loved the pattern! So I needed a new project. (Like a hole in the head.) Somewhere I saw a bean bag, and that combined with the animal prints combined with reading too many counting books to my almost two year old created the idea of counting bean bags. One pig, two sheep, three chickens, and they must stack, because that’s what you do with toddlers, stack things. You stack things and then they knock them down. (^_^) So I made them. I think it took about three nap times? And then I wrote about it so you could make them. That also took about three nap times. Why do things always take longer than it seems they should? They happen so quickly in my head.
Choosing Your Fabric
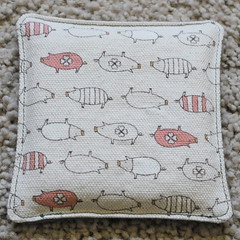
Find a nice closely repeating animal or other novelty print. I used three Kokka Trefle prints, with pigs, cows and chickens arranged on a hexagonal repeat. I really liked this print, but the animals were a little too close together, it made corralling a set of them from their neighbors a bit tricky. So if you don’t already have a beloved fabric in mind, try to find one with a little elbow room between the animals. But not too much. (^_~)
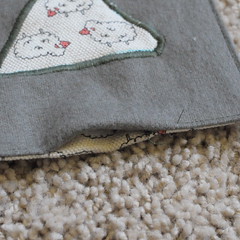
Choose your bean bag body fabric. You need to use a fairly heavy fabric, heavier than quilting cotton, to hold the beans or rice you’ll be stuffing them with. Home dec fabric or canvas is fine. (But make sure you don’t use something so thick your machine can’t stitch through four layers of it.) I used an extra thick cotton flannel for the fronts, and the canvas Kokka Trefle prints for the back. If the fabric you want to use is too thin you can always back it up with a layer of white cotton. You can use the same background fabric for the front and back, or do what I did, and use the animal print for the back, which I think makes a nice contrast between the front and the back when your bean bags are in a jumble on the floor. And I love these Kokka prints and wanted to see as much of them as possible. \(^_^)/ <3 <3 <3
Designing and Cutting the Applique Pieces
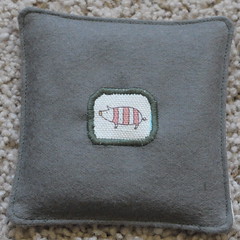
Take your animal or novelty prints, and, using a temporary marking pen or pencil, outline sets of animals. Start with a set of one and end with a set of however many bean bags you want to make. I made 9, so I outlined 1 pig, then two chickens, then three sheep and so on. If the animals on your print are closely spaced, it may take some creativity to draw a nice shape around them. If you can, use only convex shapes – like circles, squares, triangles, diamonds, pentagons, etc, and not concave shapes, like the capital I shape I used for the five of pigs. I couldn’t come up with a better shape, but I’m not very happy with that one.
Finally, cut out each outlined set of animals with a generous border, 1/2″ or so, you don’t need to be neat because you will be trimming them later.
Sizing the bean bags
Now work out exactly how big each of your bean bags should be. The bean bags I made are each 1/4″ larger than the previous one, so they stack nicely. I wanted them to be 1/2″ larger for a more dramatic pyramid shape, but then it seemed that either the smallest would have been too small, or the largest would have been too big – from 1 to 9 that would have been an increase of 4 inches from the smallest to the largest, (1/2″ * 8 = 4″) which I think is too much, but if you are making fewer bean bags you can make the increase from one to the next larger than 1/4″ and still end up with reasonable sizes.
Start by finding the longest or tallest group of animals you’ve made, probably the highest number, 9 for me. Measure the largest dimension (width or height) of that groups outline, then add an inch of padding for each side for the border (2″), and then add another 1.5″ for the seam allowance and edge stitching. You can tweak these values to suit yourself of course. I came up with 4″+2″+1.5″=7″ for my 9 of sheep.
To help make sure all of your appliques will fit nicely on your bean bag tops we’re going to write out all the bean bag sizes in a table. First write out a row of numbers, 1 to the number of bean bags you’re making, and write down the size for your largest bean bag shape, with and without seam allowance, under its number. Then add 1/4″ to each subsequent larger number, and subtract 1/4″ for each smaller one. (Or 1/2″ or whatever you’ve chosen for your increase/decrease ammount. Now is the time to play with numbers.) For my example I wrote 5.5″ and 7″ under #9, and came up with a table that looked like:
| Number: | #1 | #2 | #3 | #4 | #5 | #6 | #7 | #8 | #9 |
| Without-seam-allowance-size: | 3.5″ | 3.75″ | 4″ | 4.25″ | 4.5″ | 4.75″ | 5″ | 5.25″ | 5.5″ |
| With-seam-allowance-size: | 5″ | 5.25″ | 5.5″ | 5.75″ | 6″ | 6.25″ | 6.5″ | 6.75″ | 7″ |
Take the without-seam-allowance numbers and compare them to the size of the groups of animals you’ve outlined and make sure they make sense, that you feel there will be a sufficient border of bean bag around each shape. This is the time to adjust your numbers upwards or downwards, just be careful to add the same amount to all of them. If you’re concerned, lay each shape out on top of a ruler, and compare the without-seam-allowance number to the size of the outlined shape. [If all this figuring makes your head hurt, you can just make all your bean bags the same size.]
Once you’re happy with your numbers use the with-seam-allowance numbers to cut out the fronts and backs of your bean bags (with any lining fabric if you decided your front or back fabric is too light weight.)
Appliqueing Your Groups of Animals
At this point you can use your own tried and true applique process or follow along with me. (In retrospect using some interfacing to keep the appliques from fraying sounds like a better idea.)
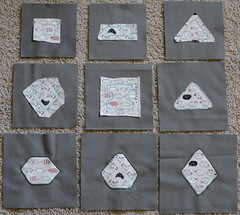
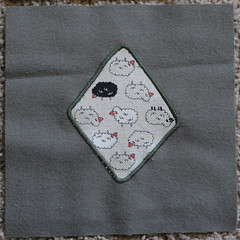
First line up each of your outlined animal groups with the top of their matching bean bag so they look centered. If your group is in a nice square you can actually center the outline, but if it is a more wonky shape, just eyeball it.
Then straight stitch along your marked outline.
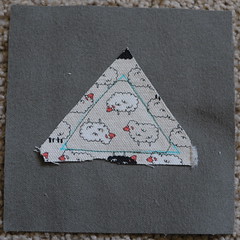
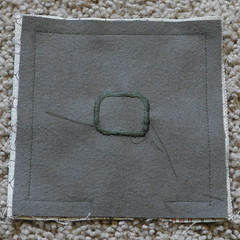
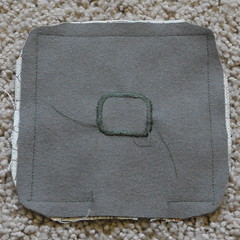
Once your shapes are all tacked down you can trim them very closely outside your stitched line, trying to be as gentle as possible to avoid creating frayed sticky-uppy bits that might poke up through your zigzag satin stitch. Aim for 1/16″-1/8″. Whatever size the trimmed border comes out, your zigzag satin stitch will need to be a little bit wider to cover from the stitching past your trimming.
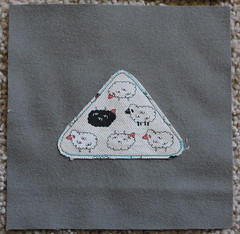
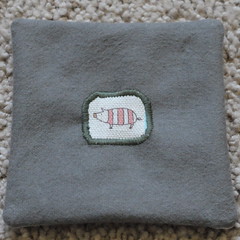
Experiment with your sewing machine on a piece of scrap fabric to find a zigzag satin stitch that is wide enough to cover the trimmed border of your shape. (You want to hide the straight stitching you used to tack the piece down.) Once you’ve found it (and written it down so you can find it again if your machine is forgetful like mine) zigzag the edges of your applique. I chose a thread color that was the same color as my bean bag top background, but if you choose a color that is the same color as your applique instead then any sticky-uppy bits of frayed fabric that poke through will show less. Your aesthetic choice.
Your tops are done, yay!
Putting the bean bags Together.
Pair up the fronts and backs of each of your bean bags, wrong sides together, making sure you have a front and a back for each. (^.^)
Sew each pair together with a 3/8″ seam allowance, leaving a generous 2″-ish gap on one side for turning and filling. If you want you can sketch in rounded corners if you don’t want your bean bags to be pointy. If you want to be neat about rounding your corners you can mark in your 3/8″ seam allowance, and then put a spool of threat just inside the corner to trace around. Bigger spools of thread make more rounded corners. You can also use a quarter or penny or anything round.
Trim your corners so they are less bulky, they will turn better that way. If you rounded your corners instead of making them pointy you should clip them.
Turn your bean bag right side out, using your fingers for soft corners, or chopsticks for pointy corners.
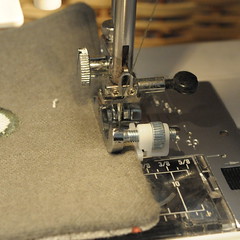
Now it’s time to edge stitch your bean bag, still leaving the open turning gap. The edge stitching makes the bean bag seam stronger, and keeps the filling from poking out. I do this now, rather than after filling, because it is harder to do once your bean bag is full of filling, the filling tends to get in the way. It also helps to use an edging foot to keep your edge stitching the same distance away from the edge. Mine is called a blind-hem foot, but whatever, it has a dial driven little guide that keeps me more or less lined up. I aimed for 1/8″, which I think gives a nice pipped detail, but anywhere from there to 1/4″ would be nice.

Filling Your bean bags
Now it’s time to fill your bean bag, but with what? And how much? The what is small dried beans, or sturdy grains like rice. I had a half gallon of white rice that had a meal moth in it (not bad for you but kinda icky) that no one wanted to eat, so I used that.
How full is a personal opinion, I like my bean bags a little flat so I can knead them in my hands a bit, I think that gives a good hand-feel. After testing different thicknesses I decided on 1/2″ – 3/4″ thick. (My smaller bean bags are slightly thinner than my thicker bean bags.)
So fill your bean bags 1/2-2/3 full, or fuller if you like plump bean bags, and then hold the opening shut with your fingers, pat it flat on the table and eyeball it against a ruler. It’s also useful to compare the thicknesses of all your bean bags as your making them, so they will all be sure to come out about the same.
Once you’re happy with how thick your bean bag is, shake the filling away from the filling hole and complete the edge stitching over the hole.
That’s it!
So many steps, but now you’re done. (b^.^)b Congratulations, now go find a toddler or other small person to play with. I’m gonna go make some tea.
19 Comments
Add Yours →[…] Bean Bags Counting is more fun with Katherine’s Counting Bean Bag Tutorial from One Inch […]
Just came over to check this out from SMS. Love this. What a great idea. I have some young neices and nephews that this would be great for. Thanks for the tute!
[…] too involved for me to do right now Fabric Basket Little Acorn Bag – except I can’t crochet Counting Bean Bags – I am so making this for Boogie, he loved the bean bag games at the Harvest Festival Money Books – […]
What a fabulous idea – I love the counting feature! I love Kokka fabric too.
Heard Tina on NPR this morning and went to her site for some ideas. Love the bean bags! Am heading home for the Thanksgiving holiday and wanted to bring something a little special for my neice and nephew that we could play with together. This works!
My grandmother made bean bags for me when I was a child. She was often my roommate when she came for a visit and we would have a great time tossing them to each other across the room to each other. As I got older, used them to learn how to juggle.
I’m going to take this idea one step further. I have an empty red plastic Folgers coffee container with a black snap lid. Am going to decoupage the outside of the container with fun pictures. The container can be used for a game of bean bag toss as well as storage for the beanbags. Thanks!
This is awesome! My granddaughter just turned 1 yr old this past August so I know she would love this. Thank you very much.
VickiT
I just made these for my nephew for Xmas. I used iron-on transfer paper to print out the patterns to go on top (eg 1 fire-truck, 2 tractors etc). I’m a novice sewer but I’m pretty pleased with how they turned out!
I am just finishing a set of these for my 21 month old son. I’m a novice sewer, and wasn’t up for the applique, so I simply sewed buttons (with double and triple knots!) for him to count. So far he loves the bags I’ve given him! Thanks for the idea!
[…] on, these clutch balls are perfect for those are learning to grab. Bean bags are perfect for little grabbers and are easy to stack. I’ve heard little guys dig playing […]
[…] On the educational side I could make some counting bean bags. […]
[…] Here are some bean bag tutorials to help you along… here, here, and here. […]
I LOVE this! its so hard to make toys for toddlers that they will have fun with! I have a fun butterfly print fabric that this would be perfect for. Thanks for the awesome idea!!!
You’re welcome! It can be a challenge to find a print with dense-but-separate images that work well for this, so congratulations on having one!
Your Etsy store is cute, I like your robot party decorations, too bad our party was 6 months ago! (And not for a boy!)
I love your bean bags!
[…] Counting Bean Bag […]
[…] Counting Bean Bag […]
[…] Counting Bean Bag […]
These are some amazing collection of bean bags.. Two thumbs up 🙂
[…] Here are some bean bag tutorials to help you along… here, here, here, and here. […]