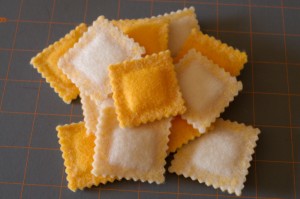
One of my daughter’s friends just turned two, and I was looking to buy her a birthday present. I settled on play food, since she has a toy kitchen and decided that something she could stir around in her pots would be perfect. Anything non edible would be better than her serving me up a plate of dirt and cheese crackers… Anyway, I looked at the HABA soft pasta, and had a duh moment when I thought, I could just make my own pasta! Out of nice wool felt! Then I had a second duh moment when I realized she was allergic to wool. So I had to use some thinner acrylic felt, and somehow the project turned into ravioli.
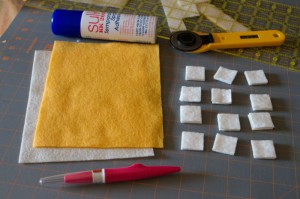
Recipe for 12 felted ravioli (2″x2″ each):
- 2 rectangles of felt cut 6″x8″, one for the top, one for the bottom
- 12 1″x1″ squares of batting, or stacked felt for the filling
- Needle felting tool and block of foam or other base for felting on
- Pinking shears
- Temporary spray adhesive (somewhat optional)
- About an hour of your time
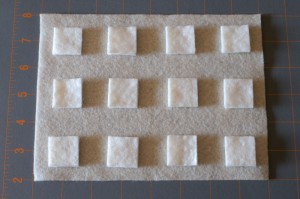
Spray the felt for the bottom of the ravioli with temporary adhesive and space out the ravioli filling. If you don’t have any spray adhesive you could use a small dot of craft glue, or cut your felt into 2″x2″ squares and felt them each individually. I did that for my first test ravioli and it worked fine, but I think to do them in a batch you need to stick them down somehow, basting the filling down might work too.
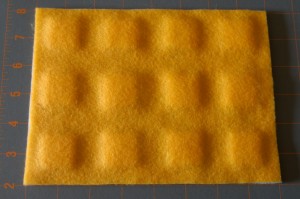
Spray the top piece of felt with adhesive and carefully stick that down over the filling, lining up the edges with the bottom felt. Once the edges are lined up pat down in between the filling to stick the top and bottom together.
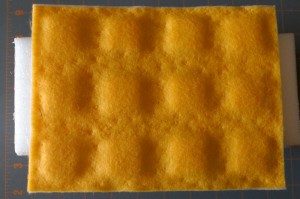
Using your needle felting tool baste the top and bottom together by punching the needle felting tool through sporadically, every half inch or so in the rows and columns between the ravioli filling (don’t felt the filling). This is important to keep things from moving around too much, since needle felting shrinks the felt and pulls things around.
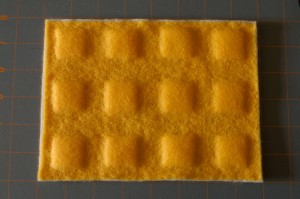
Spend 10-15 minutes thoroughly felting the rows and columns between the ravioli felting. Felt tightly around the ravioli filling to give it definition, and be sure to felt all the way to the outside edges too.
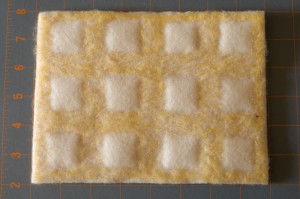
Once the top looks fairly well felted flip it over and go at it for another 10-15 minutes from the other side for good measure. When you get through with that tug the felt around in your hands to make sure it feels good and solid. If you think it needs some more felting give it some more.
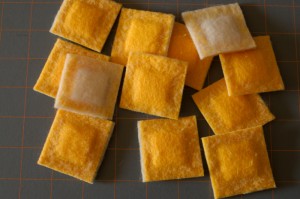
When you’re good and sick of felting cut down the center of the rows and columns in between the filling. You can just slice them apart with the pinking shears if you want, but they are so clunky I was afraid I would cut too close to one side or the other, and this way you can finesse the corners.

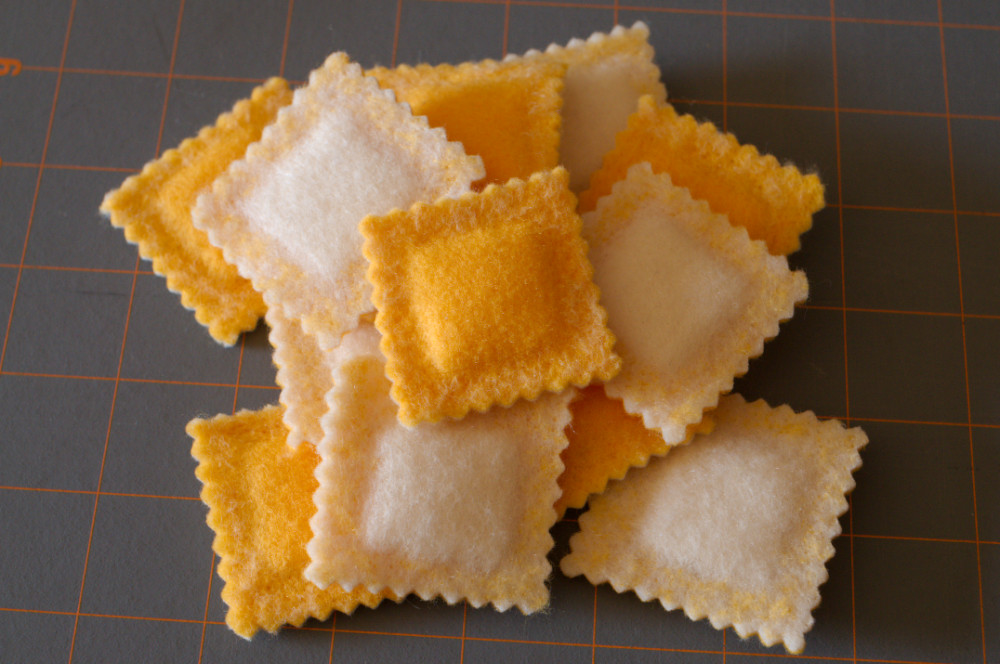
Pink around each of the ravioli squares. After pinking the first side line up the shears with the cut corner for the next side so that you don’t get wonky shapes at the corners. Unless you want wonky shapes at the corners. That would probably be more realistic. (^_^)
Done! Hurray! Now I need to make some farfalle pasta.


29 Comments
Add Yours →Looks delicious, almost as if you were making the real thing! I didn’t realize you could use felting needles on acrylic felt, thanks!
[…] *drool* I am so in love with felt food. I just noticed these tutorials for felted Farfelles and felted raviolis. […]
I *LOVE* these! Felt food was my absolute fav as a kid. I’ll be linking!
I just finished making ravioli, farfalle and tortellini, for two of my grandchildren. I used the sewing machine and wool felt. Wished I had seen your site first. Duh…needlefelted, looks just like the real thing. I also crocheted meatballs (very realistic looking in brown tweed), and added a random \sauce\ shape in red wool felt!
Hi,
I am new to this whole world of felt and food making. I am looking into this b/c I have a two year old son, a two year old niece, and my sister has 7 month old twins. SO I need to find something else to craft besides tote bags and blankets. This stuff looks amazingly cool and fun. Any tips for a newbie? I mean, can I just use the squares of felt from the fabric stores? what is felting exactly? do I have to do it or does it just make things look more authentic? I LOVE YOUR SITE. You are now my #1 resource for the felt food stuff!
[…] have never sewed a felt anything before. I’m going to try out the pasta pattern I posted from one inch world and then I am going to move on to more complicated things. Oh, speaking of one inch world, she just […]
They look wonderful! What a great idea for a present.
[…] Ravioli 2 […]
Love these! I have made them just by sewing 3 sides of a square and poking some fiberfill in the middle before sewing the 4th side, and then pinking the edges. But the needle-felted version looks so realistic! (thanks for the tip about the corners, I always end up with wonky corners)
Thanks! I’ve seen that ravioli version too, which I’m sure is a lot faster.
[…] has nothing to do with anything other than I think it’s the cutest thing I have ever seen. FELTED PASTA. In fact, felted ravioli and felted bowtie (or farfalle) […]
[…] like the simplicity of these felted raviolis, with their pinking shear-cut edges. This crafter also has a tutorial for felted farfalle pasta […]
[…] Absolutely adore this silly little craft project as seen on Craftzine: felt ravioli! There’s even some felt farfalle which are even more adorable. The original idea and tutorial originally seen on One Inch World, and the link is here. […]
[…] play food is certainly very appealing. I love these simple tutorials by One Inch World to make felted ravioli and farfalle bowtie pasta. Too cool. Incidentally, these are great birthday gift […]
[…] […]
I was wondering what kind of sponge is underneath that you used for felting these?I bought a felting brush @ Joann’s but it’s to small for a project like this.
I’m so sorry, I meant to answer this sooner, but my internet has been so awful on vacation that I haven’t been keeping up with anything! I probably used a piece of packing foam, now I have upgraded to a large (4″x6″ probably) Clover felting brush, which I quite like. I’d look it up for you, but at 3KB/second I really can’t!
[…] researching Wonton Wrapper Ravioli via Google's Blogsearch this evening, when I came across this gorgeous felted ravioli by One Inch World. Visit her blog for the full tutorial, and even more ace stuff! I think these […]
Thanks for this fantastic tutorial! I’d love for you to link this (and any other felt projects you’d like to share) up at my Felt Food Roundup on OneCreativeMommy.com. I hope to see you there!
Your link up is beautiful, I’ll try to join it tomorrow!
It’s long overdue, but I’m finally posting features from my Felt Food & Projects Roundup on OneCreativeMommy.com. Year great idea will be featured tomorrow. Don’t forget to stop by and grab a featured button!
[…] love this Felt Farfalle and Felted Ravioli by One Inch World. Doesn't it look just like the real […]
[…] für Nudeln gibt es zum Beispiel hier oder hier. Im Prinzip braucht man nur ein bisschen Filz, etwas Faden für die Farfalle und eine […]
[…] ?One Inch World […]
[…] Ravioli – One Inch World share this super simple play food […]
[…] wonderful sewing tutorials, including several for felt food. Just check her sidebar. I think her ravioli tutorial is especially clever as it is the most efficient way of making felt ravioli that I’ve seen. Many […]
Those are things, of course, that can be learned in many different ways without having to experience deprivation. Everything is clear and open and
there are no ‘hidden extras’. The user will also have to pay
for safety and emissions inspections and any traffic tickets.
[…] Ravioli van One Inch World […]
[…] by http://oneinchworld.com/blog/index.php/2008/11/felted-ravioli-tutorial/ […]