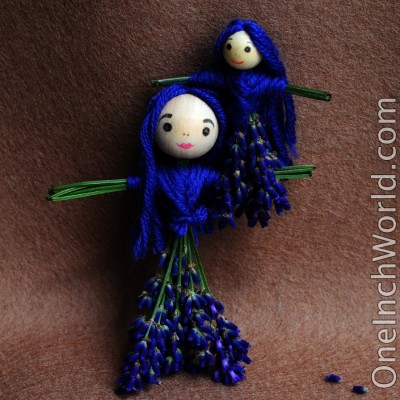
We are visiting my inlaws in Vermont for several weeks, and in addition to an immense forest to play in they have several enormously happy and productive lavender plants which are all spewing flowers. This doll is one of the things I came up with to do with them. She is loosely inspired by Grandma Nenny’s sweet grass dolls.
Things you will need:
Fresh lavender – fresh enough to bend in half without snapping.
A wooden bead, or something round with a hole through it for the head.
String for hair and shirt
Scissors, craft glue and something to draw a face with.
First draw your face, or draw your face last, or perhaps sometime in the middle, possibly never. There are many long traditions of faceless dolls, although sometimes I think they are a bit creepy. Besides, whenever I don’t put a face on a doll Rebecca always asks and asks and asks until I put a face on them. So draw the face.
Cut some hair by looping the yarn around your hand about seven times, depending on the size of the head and the hole in it, and cut the loops. Or, you know, don’t. If you have any roving that makes lovely hair. Moss does too. And daisy hats are always in style.
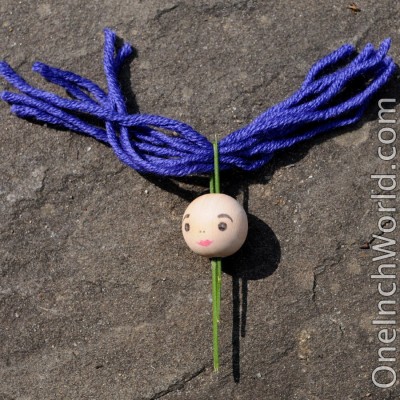
Take a lavender stem, fold it in half around the middle of the hair and thread the stem down through the head.
Pull the hair down halfway through the head. If it feels quite stuck then perfect, you’ve used the right amount of hair, nevermind how it covers the fairy’s head. If it feels loose, but you don’t want to add more, you can pull it out again, put a drop of glue down the hole and pull it in again. If it doesn’t fit, you’ll just have to figure something out, probably involving either glue or knots.
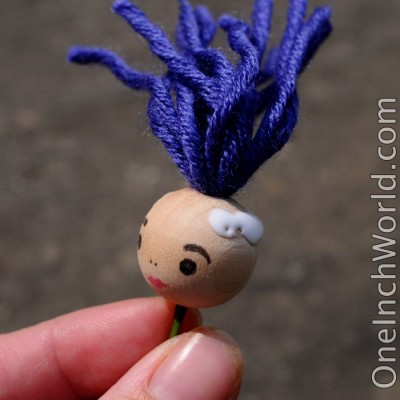
Hold the hair up and put glue around the hole in a C, leaving a gap for the face.
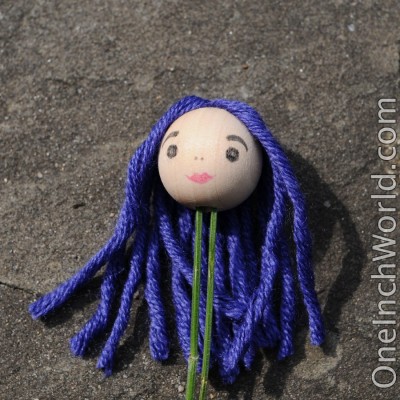
Pull the hair down into the glue strand by strand to create an even layer all around. If you think fairies should have bangs, don’t leave a gap in the glue for the face. Or also if you think fairies should look like Cousin It. No reason to keep it all one color either, pink in front, blue in the back, or maybe striped orange and black like a tiger lilly.
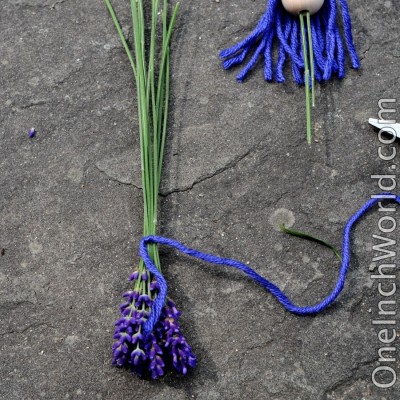
On to the body, the dancing skirt, the home of the heart. Gather your lavender into a bundle, the tips of the blossoms all at the same height. You will want somewhere between 6-12 stems of lavender depending on their size and the size of the doll. This is art, not science!
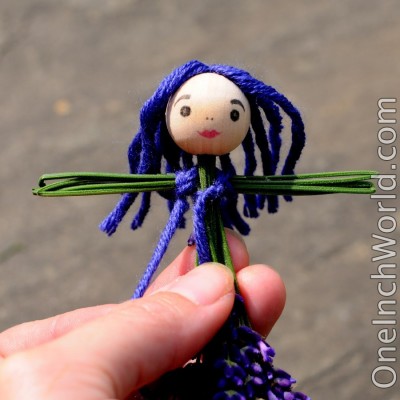
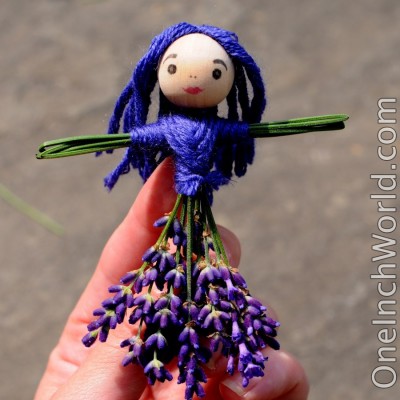
Tie a knot to hold the bunch together, leaving a two inch tail on one side, and several feet or the whole ball uncut on the other. If you are thinking about proportions, the knot will be just below the finished dolls arms. The dolls I like the best have had the knot just above the top of the highest bud. The one in the picture is a bit high I think.
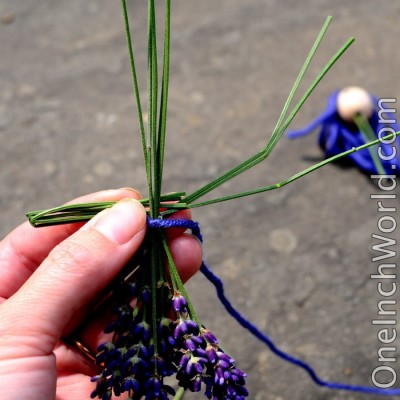
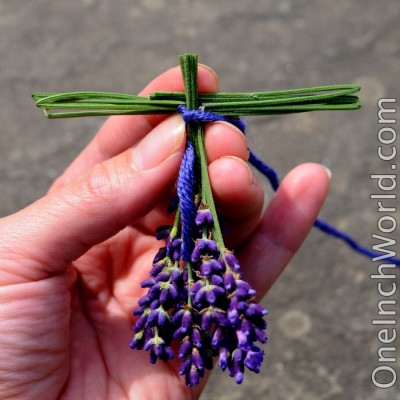
Bend 2-3 stalks straight out to either side just above the knot. Decide on an arm length, then bend the stalks back double and trim them 1/4″ to 1/2″ past the central stalk, so they go behind the sticking up stems and overlap the other arm a bit.
Trim the unbent stalks off at half a head height above the shoulders. So if your head is 1″ in diameter, trim the stalks off about 1/2″. The stalks should give you a little bit of neck, then go into the head and rest against the hair stuffed down the bead shaft.
Attach the head next. It’s a bit fiddly. If you like glue put a bit in the bottom of the head. Then thread the lavender stalk coming out of the head down through the knot holding the body bundle of lavender together. Keep pushing the head down and feed all of the neck lavender stalks into the neck hole of the head. Pull the body knot tight if it’s come loose. There’s nothing holding the arms bent at this point except my finger, don’t worry if they are waving wildly around, just gather them up again once the head is on.
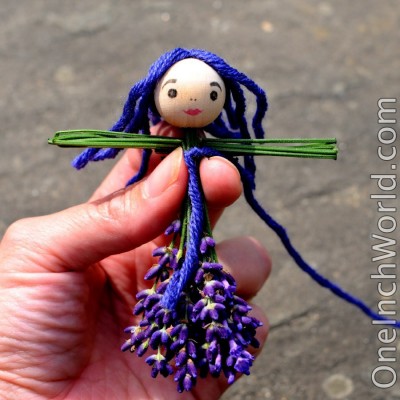
From now to the end tuck the short tail of the yarn down with the skirt, we will want it to finish the knot at the end, so don’t loose it, just keep it out of the way. Tie two half hitches, (does that make it a full hitch?) around each shoulder to hold the arms together. Just tie two on one side, pull the yarn around behind the shoulders and tie the other two for the other arm.
At this point the doll is structurally done, and how you wrap or knot the shirt is a matter of taste. First, before you start wrapping though, give her a kiss for her heart!
For the shirt I like to wrap the yarn from the shoulder down the arm for a sleeve, then wrap back to the shoulder, cross over the body, wrap down the other arm and back up to the shoulder for the other sleeve. But leave her sleeveless if you want. Then for the body I alternate wrapping around the waist/chest once, up over one shoulder, down and around the waist, up over the other shoulder and back to the waist and around. Do that a handful of times and it will create a woven ‘V’ front. When you are done wrapping the body tie a square knot, with the original tail you’ve been saving, over her hip, in the middle, or wherever you like it. Trim the ends.
Then make another one so they can be friends. Once I finished this one I had to make a baby for her. Hugs! And now I’m feeling a strange urge to sew a felt kimono for her…
Why do tutorials always take 10 times longer than you originally think? This really is a pretty simple doll, and exactly how you do the steps doesn’t much matter, so don’t worry, go out and pick some lavender. Or grass, or some weeds. Hmm. Next I will make her a friend ‘clover’! Let me know what happens with you!


23 Comments
Add Yours →Such a great idea!!
[…] One Inch World » Blog Archive » Lavender Doll Tutorial. var a2a_config = a2a_config || {}; a2a_config.linkname="One Inch World » Blog Archive » […]
Hi Katherine,
Thanks for visiting my blog — it has been a pleasure to welcome you there.
Your lavender doll is just cute — thanks for sharing this tutorial. 🙂
Greetings from Munich,
Birgit
Gracias por compartir tan bello trabajo, amo las lavandas y tengo muchas en mi jardín. Mil bendiciones
please put me on your automatic mailing lists
Had to come by and say how cute these are! I love lavender and LOVE your little dolls! Saw you on Craft Crow – k
Saw you on Crafty Crow, and love these! i have never made a doll before, it always seemed too hard, but this i think i could do. i’m thinking spearmint…but i did have a Q. you said to do 2 half hitches, what is a hitch? thank you!
erin
ps after seeing these i have considered adding lavender to my garden, but there are a dizzying array of varieties, and i was soon lost. any pointers or tips?
Karen, I don’t have a mailing list, but you can follow my rss feed at feed://oneinchworld.com/blog/index.php/feed/
Thanks so much Kerry! Your owl is really cute!
Erin, it really doesn’t much matter what knot you use to hold the arms in place. A plain overhand knot is fine. The kind of knot that I used, two half hitches which begin a spiral are explained here in steps 3&4 http://www.free-macrame-patterns.com/half-hitch-spiral.html I hope that helps!
The lavender used for this doll is some variety of English Lavender. Until you asked I had no idea there were so many varieties!! I have no idea how to choose among them, what I do is just go to the garden store and they usually only have a few choices, and, after all, too many choices generally make folks unhappy. I wouldn’t pick a hybrid though, since they won’t reproduce and spread all over your garden, which is one of the lovely things about English Lavender.
Very nice!! It’s a good idea!!!
Thanks so much mami!
wow, the colors are so vibrant! when I was little I used to love playing outside, imagingin all sorts of magic little people who lived in the forest. Your lavender doll would make the perfect forest fairy!
Thanks so much, we really had fun with them!
[…] Klasik lavanta keselerinin yerine böyle bir lavanta bebek yapabilirsiniz. Yap?m? için buraya […]
Hello,
We are a monthly magazine on gardening and have a feature “spot on the internet” and for our issue 7, prod. 1807 we like to publish your pictures of lavender doll tutorial. We like to receive the pictures high resolution (min. 300dpi), dimension 10x10cm.
Please inform if you agree and can send the pictures. Looking forward to hear from you,
kind regards,
Willy
Yes, I will send them to you, do you need all the images from the tutorial or just some of them?
This little doll is super cute! I would love to use this craft with my kids at botany camp this summer, at the Idaho Botanical Garden. I’ll have to experiment with grass and clover, too. I wonder if it would be possible to make boy dolls (or I could call them puppets) by using just two lavender or grass flower heads for legs, and all the rest plain stems. Perhaps adding maple seed wings would be fun, too.
I’m sure there are lots of directions that you could take it. Looking back it belongs in the same category as yarn dolls or corn husk dolls, so any of those variations might work, for legs you could just bind something around each ankle as you do with yarn dolls, keeping all the lavender flowers. I’m sure there are lots of other adornments you could come up with, like birchbark. I don’t think that clover is very sturdy when it dries? Not the kind I am familiar with, but bundles of grass, with or without seed heads, would work great. I have also glued beads onto the stem end of some kinds of pinecones which make fun people. I just googled ‘straw dolls’ and there seems to be a lot of creativity and history there. Also, your camp sounds awesome!
I’ll stay away from clover, then!
Usually camp focuses mostly on science, but we do include a craft every day. This summer we have one whole week that is centered around Nature Crafts as its main theme. That has really sent me searching for new ideas, so thanks for letting me borrow some! 🙂
[…] voor een duidelijke werkbeschrijving op Oneinchworld. Hier vind je nog veel meer fröbelinspiratie voor de […]
Hi There
I have a small Lavender field where I live in Suffolk in England and I grow Hidcote and Munstead. Hidcote is a shorter stem Lavender great for drying in small bunches. My Munstead is highly strong in scent and has a much pointier head and long in the stem, great for making wands.. Both these have reproduced and have given me well over 40 babies. There is also a Grosso lavender that grows very large and has a beautiful scent. I use this for wands and it can be used for culinary purposes too
I love your dolls and am going to make some tomorrow. I always just draw two eyes on my dolls quite close together, as I tend to find faces eeerie.
Thank you so much for showing us how to make them. I also, like Erin, was not sure what a hitch meant, but I think it means a knot, never the less I am sure I will work it out. Thanks again for your fantastic idea. I will enjoy making them .
Best wishes
Mary The lavender Plot
[…] Tutorial di oneinchworld […]