Wow, it’s been a month. All I can say is, I hope you’re using a blog aggregator to read me! I’ve switched to Feedly since Google Reader karked. I like it! Except it doesn’t do a very good job marking posts as read when I quickly scroll through the card view. I’m hoping that gets magically fixed soon. Of course this caused me to look at my Feedly feed and get distracted reading blog posts for literally an hour. Because, dear reader, I may say this is a No Obligation Blog, but that is more of a goal for me than a statement of fact. Truly, when it has been more than a week since I have posted I start avoiding my blog, and feeling as if it is this big dark failure thing. In my head it is a big black cloud with large eyes and robotic spider legs. Leering. One little thought about blogging and my brain protectively whisks it out of sight, by shoving something shiny into my fore-conciousness, like felt sheep, apple pie, reading someone else’s blog, or even cleaning the bathroom grout. Really, when it has been a month like this, cleaning the bathroom seems less threatening than breaking the silence. Even this intro paragraph is probably an insidious form of resistance! So! Urgh.
Maker Faire was coming up, and we were going with several of our art friends. (It makes me smile that we have a category of friends who are our ‘art friends’. School friends, park friends, farm friends, art friends.) And I wanted them all to be able to wear something to Maker Faire that they had made, to know in their hearts that they were makers too. When they looked at all the awesome projects I wanted them to think, they’re a maker, I’m a maker, maybe someday I will make something like that too. Which, when it comes down to it, is one of the core reasons I run this group, to create a peer group of girls who all know they are makers, and have a strong foundation of skills to create wicked awesome things when they want to.
Hey, I think I just wrote a mission statement. Whoa.
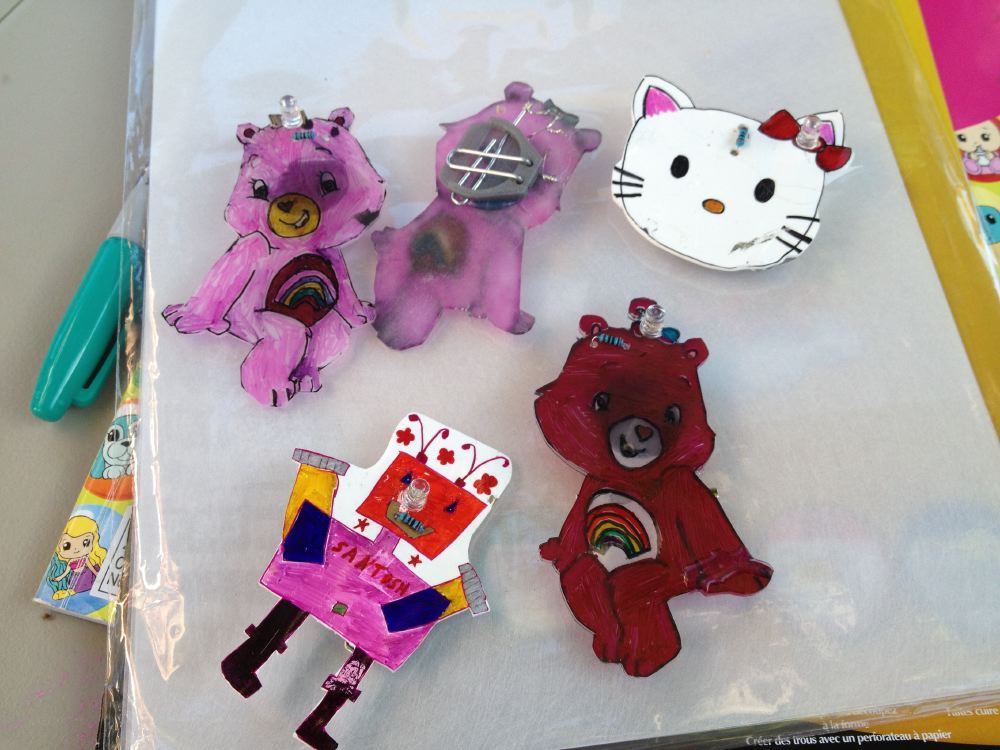
So, anyway, from that need, LED pins were a simple answer. I have made them out of cardboard before, but I thought shrinky dinks would give them a brighter and less junkyard DIY look, as well as being sturdier. And doesn’t seeing a resistor in the middle of Hello Kitty’s forehead make you a happy geek?
Parts:
LEDs & resistors: I bought a pack of microtivity rainbow LEDs that came with resistors, bonus.
Button batteries: lithium coin cells, 2025 or 2032 or whatever (did you know the first two digits are the diameter in millimeters and the second two digits are the thickness in tenths of millimeters? So a 2032 is 20mm across, and 3.2mm thick.) They are 3 volts which is perfect for powering an LED.
Battery holder: We used our 3d printer and printed some funky holders that you have to bend paperclips into for the contacts (via thingiverse) but there are quite a lot of them on digikey that would work great for holding 2032 cells or whatever size you have.
Pin backs: from your local craft store or Amazon
Shrinky Dinks & markers: same thing.
Hot glue stuff
(none of these are affiliate links, I’m just not that fancy.)
Given that these battery holders are about 1″ across we needed a pin that was about 2″ across, so since shrinky dinks shrink by a factor of 3, everyone started with a half sheet of shrinky dink paper (roughly 8″x5″), a stack of coloring books we never use, and a pile of sharpies. (Did you know sharpies aren’t light fast? We colored on some outdoor chairs, and they are so bleached now. I was kinda surprised.)
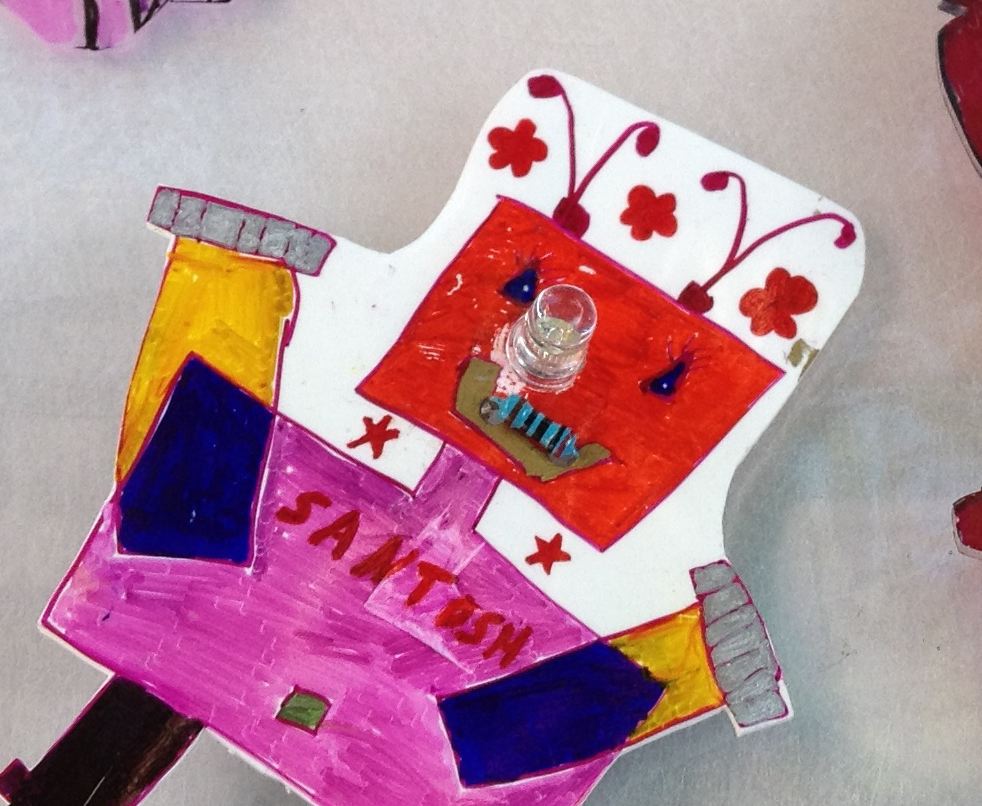
After the girls cut out their creations and before they shrank them we punched holes where we wanted the LED and resistor to go. To figure out how far apart the holes should be, measure the distance between the component leads and multiply by 3. I tested the spacing on a small scrap piece of plastic so that I could test and tweak before punching the girls precious creations. (There is nothing worse than being the adult that ruins their work. Kills me.)
While we were figuring out where to punch the holes we talked briefly about how all circuits are circles, that electricity flows in circles. To get an LED to light up you need to create a circle for the electrons to flow out of the battery, through the LED and back into the battery. To keep the LED from popping, and your battery from over heating, you need to add a resistor into the circle to limit the number of electrons racing around the circle.
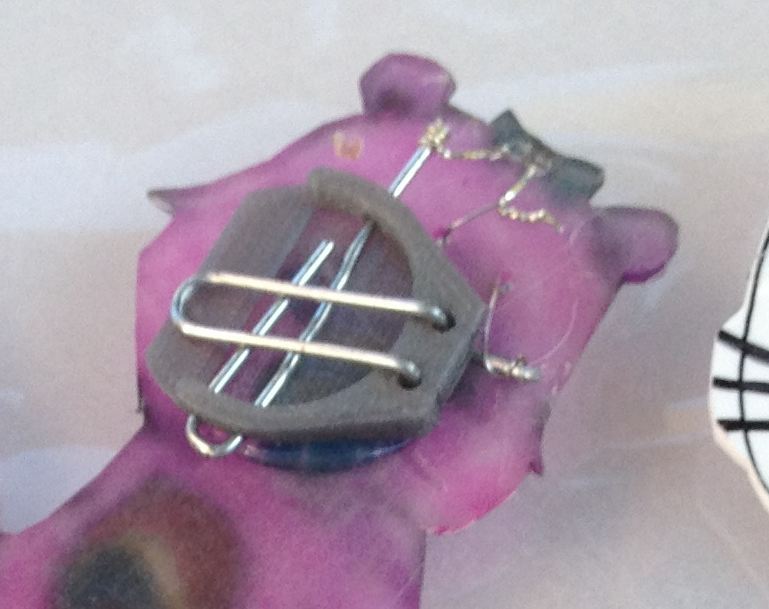
After shrinking the plastic we hot glued on our battery holder, and then twisted all the wires together good and tight. Then we painted them with conductive paint, but you could solder them or just put a blob of hot glue over them to hold them together and guard against oxidation.
Sorry about the awful picture, I only have one picture of this project and I had to crop it into different views! Stupid! I get so caught up when everyone needs help. I actually have an alarm on my phone that says ‘take pictures’, 15 minutes before the alarm that says ‘clean up time’, but when I am caught up neither one works. Well, actually my friends hear them, and then *they* know it’s cleanup time, even if I am oblivious!
And if you haven’t checked out Bare Conductive’s paint before, it is pretty cool! They have some neat kits, and I think the whole idea of building circuits out of paint has a lot of unexplored creative space.
Then the only thing left to do was glue on the pin back.
We turned the circuit on and off (to save the batteries) by slipping a piece of cardstock or un-shrunk shrinky dink plastic in between the battery and the top contact. You could also add a switch to the circuit.
Please remember, button batteries can kill children if they are swallowed and need to be treated with respect. If there was a young child in my household I would slather the button battery & holder in hot glue, ensuring it wasn’t going to accidentally come free and get swallowed. The hot glue can probably be cut and peeled off when it is time to change the battery, the tricky part would be doing it in such a way that you can still stick a shim in between the battery and the holder to break the circuit and turn it off. Or you could be sensible and add a switch!
After finishing this project the kids were really proud of what they had made, which is pretty much the best.

3 Comments
Add Yours →I can’t wait to take my kids to Maker Faire! Can’t wait to go myself, actually!
Did I read correctly that you OWN a 3D printer?! So cool!
Maker Faire rocks, we went one day with kids, and one day without kids, just me and my husband. So nice. Although Rebecca managed to get invited back for the second day with one of her friends, so technically she was there, just not with us!
We do own a 3D printer, a Makerbot Replicator, we got it last summer for our 10 year anniversary. Because, basically, we are both geeks. It’s pretty awesome, but being limited to plastic is, well, limiting. It has made it more clear to me that you can design something really pretty cool, but when you print it in plastic, it looks like cheap plastic junk. When you look at it one way, it is awesome because you designed it, but on the other hand, it is kind of just plastic junk. It was fabulous when I wanted to design custom weaving heddles and other tools for my textile class though, and generally makes me feel like I can make anything.
Just wanted to say thank you for the inspiration! I can’t believe I didn’t think of this earlier!