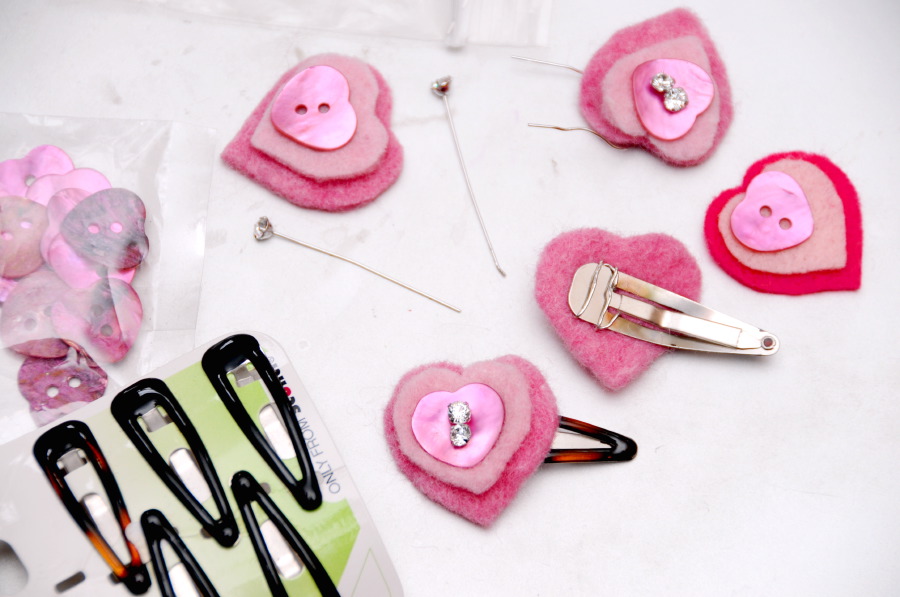
Posts Tagged ‘Crafty’

No Sew (No Glue) Heart Barrettes

Wednesday, February 23rd, 2011

Okay, so maybe everyone doesn’t have crystal head pins in their stash, if not you can improvise with a sparkly pipe cleaner, or a piece of wire and some sequins or beads, or heck, sew it together with some yarn. Forget the title, it’s not important!

We made these for a few of Rebecca’s friends for Valentine’s day. I was trying to come up with something that she could make for her friends, out of materials that we had on hand. I did cut the hearts out though, and she ended up needing some help twisting the wires together, so the ‘make it herself’ part was only a little bit successful. She pushed the head pins through the hearts and barrettes, and helped with the design though. Also, since I’d started with the design constraint ‘something that a 4yo might be able to do’, they were easy enough to make a bunch without pulling my hair out. WIN!

Am I starting at the end of the story? Well, let me give you the basic instructions in case you haven’t already figured it out from the picture.

Take a heart button, a regular sized barrette, and a couple of crystal head pins or other type of wire. Put the button on top of some felt and use it as a template to cut out a larger heart shape. Stack the felt heart on some more felt and cut out a yet slightly larger heart. Stack the button and the two heart shapes, and (help your 4yo) stick the head pins down through the button holes and through the felt. Slip the pin wires down through the prongs of the barrette at the wide end, and twist the wires around the end of the barrette, making sure that the pokey ends get tucked in between the barrette and the felt heart. Ta Da!

I know, you got all that from the picture right? Did you figure out why there is one set of hearts that is a radically different color of pink? No, we didn’t run out of lovely naturally dyed wool felt. One of Rebecca’s friends is allergic to wool. :-( Do not pass Go, do not go to Waldorf school, do not collect $200. Do get a sparkly barrette anyway!! Very important.

Twirly Skirt

Friday, February 11th, 2011

Here is a beautiful skirt we made based on the under skirt from the Insa pattern from ‘Sewing Clothes Kids Love’. This is the third time I have sort of used this pattern. (Here is the second.) I don’t think it really counts this time, because I changed the curves, and I realized at the end that it was basically a circle skirt (but sewn out of four wedges), with a straight waist. Not very fancy fundamentally, although there was lots of subtle pink ribbon trim following the book’s philosophy that more trim is better trim. :-) The fabric is really the lovely part though, it is a cotton faux linen, covered with floral embroidery and sequins that I got half off with a coupon from Jo-Ann’s. (Really it seems that their entire business model revolves around getting people back in their stores to use coupons, and if you pay full price for anything it is ridiculous… Not my favorite game.)


Hey, I never posted the first one either, this one was for a friend’s daughter, I probably wouldn’t have picked these fabrics out for a skirt, but I really liked it when it was done. You can’t really tell from the photo, the red fabric is a fine corduroy, actually the same that I made my own red skirt from. It made a nice skirt the first and second times, corduroy has a nice weight.

Did I make either of these recently? No. My life for the past two or more weeks has been devoted to reading the good, the bad and the crazy about Waldorf schools (no black crayons? Anthroposophism? There seem to be some pretty bitter ex-waldorf parents, but everyone I’ve met involved with Waldorf has been really really nice) and trying to decide if we want to go through the admissions process. Most of it seem very cool, and a lot of it aligns with our personal values, we actually have no TV, (we do watch movies on laptops sometimes), but it is so expensive here. Maybe we could get financial aid, but I’ve always *hated* bargaining. Also our lease came up, so we had to re-evaluate the whole rent/buy thing. Where we live the rent/buy ratio still makes it much cheaper to rent an equivalent house than buy (using the simple numbers OR factoring in all those headachy numbers like maintenance and property tax exemptions.) Major life decisions and uncertainty. I’ve been getting pretty depressed with all the uncertainty. The other kindergarden we’d like, Stevenson PACT, is a lottery, and we won’t know whether we got in/where we are on the wait list until the end of March. Bleh. Maybe I should make some more twirly skirts for morale? I have been making fermented pickles like crazy, using a new-to-me no-mold-skimming fermentation lock process. (I know, mold on your pickle brine is fine! No. I do not feed my family things with mold on them, or near them, or whatever. I can’t get over it. Yuck.) Two thumbs up for no mold and yummy pickles. Something to be positive about anyway.

Gingerbread Marble Run

Saturday, January 8th, 2011

Is it unseasonal to post this now? I should start pre-dating all my holiday activities a year in the future so people see them at ‘appropriate’ times. Whatever. When my kids are older I’ll magically become more organized…

Also, there is no gingerbread or actual marbles involved in this… it should be titled “Graham Cracker and Everlasting Gobbstopper Run”, but…

Every year (okay, maybe every other…) we build a gingerbread house, usually at a big party with our friends, which we used to host, but due to living in a tiny house this year Chris hosted it, which was AWESOME of her. This year we couldn’t get inspired over any particular architectural undertaking, although there are some awesome modern gingerbread houses, and super realistic ones, and, oh dear, prison yards and peep shows… But, gizmos are always good around here, so we went for the rolling candy castle. We ran out of time (carefully mitering gingerbread strips takes time!) to really decorate this, so it’s not very candylandish, but it does run! And that’s the important thing around here, or is it?

Proof (here’s the straight link if the embedding is being flakey…):

Hopefully that video link thing works for you.

Awesome? We think so. And I should clarify, we is me and my eternal partner in gizmology, my awesome husband Jesse.

Next year, unless we do something totally different which is probably what will happen, it would be cool to go for taller, add tunnels, and some ^ points where the ‘marbles’ can split directions. How about plinko? Perhaps a rolling car? So many possibilities once you get away from just ‘house’.

Clothes for Mom

Sunday, November 21st, 2010

I was inspired by MaryAnne’s participation in Hazelnuts’ Clothes For Mum Challenge. So I got off my bum and sewed a skirt for me instead of Rebecca. You get the picture of me jumping, because I look too embarrassed in the other pictures! I was aiming for Harajuku with this skirt + tights + legwarmers. The self conscious side of me thinks this outfit is much too young for me, but it makes me feel happy, so I’m trying to thumb my nose at the self conscious side. How old am I? I am 34. I don’t think I look much like 34 in this picture, does that make me silly? Oh well! I am also planning to make some longer skirts that don’t involve crinolines under them so that I can look elegant and beautiful chasing across the playground like MaryAnne.

Oh yes, it’s hard to see, but I also made matching corduroy bows! Ah yes, the skirt is corduroy from my stash, along with some vintage cotton(!) ricrac that I just picked up at an estate sale, and some old black lace I had in my lace drawer. The bottom ruffle was supposed to be longer, but I ran out of red corduroy. And I am loving my serger, I got some extra black on red detail by serging the bottom and top of the bottom ruffle rather than hemming them. Way easier and cheaper too! Well, not if you count the price of the serger, I haven’t done nearly enough sewing to amortize that cost yet!

Also, I am re-in-love with my ruffling foot. Gathering foot? Pleating foot? Whatever. It is awesome. I used it to gather my skirt, and it is so much easier than basting and hand gathering! Which I had to do for the bottom ruffle since I ran out of corduroy and the one downfall of ruffling feet is they are hard to tune exactly. Gathering the bottom ruffle was not fun. (Yes this picture is from a different project.) But the extra thrilling part? This is an antique Singer ruffling foot, but it seems to fit and work just fine on my antique Elna. SO HAPPY! I thought I was going to have to invest in all new feet for my new/old sewing machine, but the old metal Singer ones I have seem to more or less fit. YES!

Things to Do, Things We’ve Done (Not Sleep.)

Friday, November 5th, 2010

I haven’t been getting enough sleep, which means my life starts falling apart and I start throwing mommy tantrums. Usually I’m pretty good at avoiding those. Must get more sleep… We’ll see how the weekend goes.

So anyway, here are some fun things we’ve done over the last several months that I never got around to blogging about.

We’ve done fishing with paper fish with paperclips and magnets-on-a-string, but this is much cooler. Valerie over at Frugal Family Fun made her fish out of pipe cleaners, which makes them easy, cute, and their whole bodies are ferromagnetic! (I had to look that term up… ferromagnetic materials are the ones that are strongly attracted by magnets and can be magnetized. Now we know.) Since the pipe cleaner fuzz keeps the magnet from directly contacting the wire you need a relatively strong magnet to put on the end of your string to go fishing. We cut our pipe cleaners up into different lengths, and made lots of fish! Now they are living in a fish patterned tea tin on our game shelf.

Here we made a stamp pad out of felt and wet it with acrylic craft paint. Then we stamped Totoro and Hello Kitty all over a pair of pants that were already in sad sad shape. Be sure to clean your stamps promptly afterwards or the acrylic paint will gum them up. Acrylic craft paint is great for painting clothes, you don’t really need fabric paint. This activity is an easy way for little kids to personalize their clothes by themselves. Getting out the letter stamps would be fun too.

Play dough with your feet. Why should hands get to have all the fun? This is home made glitter play dough. More sparkles is better. Rebecca had fun kneading the sparkles in. That may have been where we started using feet, I can’t remember!

If you get a box in the mail and it is full of bubble wrap, put it in the driveway! It is super fun to zoom over. Then you can revert to the traditional mad stomping dance to pop the rest of the bubbles. At our preschool they buy a big roll of bubble pop just so the kids can do this once. The environmentalist in me cries, but the kids loved it.

You can tell I’m tired from the preponderance of short declarative sentences. I’ll go work on that sleep thing now.

Glowing Play Pumpkin

Thursday, October 21st, 2010

This is a mashup of a felt board dress up pumpkin and a decoupaged candle holder. With it you can have a different pumpkin friend every evening, or experiment to find your favorite pumpkin face for carving!

We made two, one is a round plastic cookie tub, the other is a glass peanut butter jar.

What you need to do this:
* Clear container
* LED candle
* One 1″ square of stick on velcro (just the sharp half)
* Black felt
* Orange acrylic paint (tempera might work)
OR
* glue and orange tissue paper

Cut up the black felt into lots and lots of pumpkin eyes, noses and mouths. Size them to fit comfortably on your container.

The peanut butter jar we painted inside with watered down orange acrylic paint. Once it was dry I took the prickly half of a stick on velcro square, cut it into 5 pieces and stuck them about where I thought the face features should go.

The cookie container we decoupaged on the inside, using watered down school glue and 1″-ish squares of yellow and orange tissue paper. Rebecca worked on the lid, and Penelope helped me with the main container. She loves mashing a paint brush around! We added a little bit of Crayola Glitter It! Tempera Mixing Medium, (which is basically just glitter glue), to the watery glue to make our pumpkin glittery, because glittery is better. :-P

For this ‘pumpkin’ I just cut the velcro square up into 4 pieces. Both layouts worked.

We decoupaged the inside of the container, but if you are using a real candle (and hopefully a glass container) you should decoupage the outside so that the glue and paper don’t catch on fire! We used an LED candle so that I didn’t have to worry about the girls tipping it over when they were playing with the felt shapes, and of course, I wouldn’t put a real candle in a closed plastic container!

Put your LED candle into the container, and Play! And then of course, cut out more faces. Keep extra felt and scissors next to your pumpkin, because you never know what sort of shape you will need next!